We are open and enrolling now for our online programs. Hear what our students are saying ...

Monthly Archives December 2023

Can You Do Yoga on Carpet?

A young woman in Child's Pose on her carpet, bringing up a question that many people have—can you do yoga on carpet?

Most yogis, yoga instructors, and yoga therapists practice yoga on high-quality yoga mats. And, for added safety and stability, those mats are usually placed on hard, even floors. At Breathing Deeply Yoga Therapy, that’s the approach we use. But sometimes people will ask, can you do yoga on carpet?

When people practice yoga at home, they may have wall-to-wall carpeting. Or they might simply prefer the feeling of doing yoga on a carpet. In these cases, they want to know if it’s safe and effective to practice on carpet, as well as any advice for how to do yoga on carpet.

In short, you can usually do yoga on carpet if you prefer. But there can also be drawbacks to doing yoga on carpet.

With that in mind, we can look at the pros and cons for practicing yoga on carpet, as well as other tips for creating safe, favorable conditions for yoga.

Table of Contents:

The Advantages of Practicing Yoga on Carpet

Can you do yoga on carpet? Should you, even if you can? Most people are able to practice yoga on carpet if they want, and there are even a few advantages to doing so.

  1. More Padding: For starters, when you practice yoga on your carpet, you get extra padding. And that padding might cushion and relieve pressure on your muscles and joints.
  2. Extra Workout: You also might build a little more muscle mass over time if you practice yoga on a carpet. That’s because your muscles may need to work harder on carpeting to keep your body in place. Yoga mats, on the other hand, provide traction to hold you still, thereby doing some of the work for you.
  3. Wider Space: As you’re figuring out how to do yoga on carpet, you’ll have plenty of space for moving and stretching. You won’t need to move a yoga mat around or worry about staying in that space. Some people find this a little more freeing when starting out.

The Disadvantages of Practicing Yoga on Carpet

Simply put, yoga mats are specially designed for yoga practice, and carpets are not. Therefore, doing yoga on carpet is not always ideal.

  1. Instability: On a carpet, you lack the support and stability of a yoga mat. The odds of falling and maybe even injuring yourself could be higher in certain situations. This is especially true when you’re doing poses that require balance. On a plush, carpeted surface, without sufficient traction, it can be quite easy to slip. Avoid a carpet that’s extra cushy since it would be less stable and harder to grip.
  2. Irritation: For some, practicing certain yoga poses on carpet can sometimes lead to rug burns and skin irritations. Not to mention, if there are any bumps in your carpet—and carpet bumps, often caused by moisture, are common—it may be uncomfortable or unstable to press down on them with your hands or feet.
  3. Hygiene Issues: There are also cleanliness and hygiene issues to consider. When you do any type of exercise, you inevitably leave hair, sweat, and oil on your workout surface. Yoga mats, however, are fairly easy to wash by design. By contrast, carpets are more time-consuming to clean.
  4. Allergens and Contaminants: You probably have certain contaminants in your carpet as well. Dirt, dust, pet dander, fungal spores, and other particles abound in carpets. When you practice yoga on your carpet, such materials could easily get into your mouth, nostrils, and pores. Consequently, they could trigger allergies or cause irritation.
  5. Wear and Tear: Additionally, there’s a chance you could rip your rug while doing yoga. Or you might flatten it, create bald spots on it, or otherwise shorten its lifespan due to all that extra wear and tear.

How to Do Yoga on Carpet Safely

If you choose to practice yoga on carpet, make sure to regularly clean the area where you do yoga. You can also either avoid poses that require more stability than you have on your carpet, or else use a yoga mat on top of your carpet. That way, you can take advantage of the mat’s traction and clean surface as well as your carpet’s padding.

If you’re planning to buy a yoga mat to use on your carpet, look for a sturdy product with a textured underside. Such a mat won’t move around or bunch up as much during your yoga sessions.

Creating a Safe Environment for Yoga at Home

Instead of doing yoga on carpet, you can use two yoga mats like this woman or an extra thick yoga mat to provide enough cushion

Of course, settling the “can you do yoga on carpet” question is just one aspect of setting up a home yoga environment. Creating the ideal space for your practice requires some care, thought, and fine-tuning.

  • First, choose a room with plenty of open space. You don’t want to, for example, hit your elbow on a table. It should also be well-ventilated.
  • Once you’ve chosen your spot, make it as conducive to your yoga routine as possible. It should be welcoming, calming, and appealing. As such, personalize it as much as you can. You might add flowers, candles, photos of loved ones, or other items that make you feel happy and secure. Just don’t make it distracting, as many yoga techniques require concentration.
  • Here’s another question to consider: Would you rather do yoga in a private space, keeping the door closed? Or would you prefer to do it in an open area like your living room? It’s totally up to you!
  • Whether you practice on carpet or not, make sure you have enough padding that you won’t hurt your joints. If you don’t want to practice on carpet, you could purchase a yoga mat that’s extra thick. Or you could even buy two yoga mats and place one on top of the other.

Learn More About Yoga with Breathing Deeply

Carol Day Young with Brandt Passalacqua

In the end, the opportunity to learn and practice yoga at home can be hugely beneficial. Whether you’re doing yoga to stay active, increase your mobility, improve your mental health, counteract a specific health condition, or anything else, being able to do yoga at home is convenient and empowering.

With a safe space and a safe surface—yoga mat, carpet, or both—you can enjoy the physical, mental, emotional, and spiritual benefits of yoga. But do you have the proper skills to achieve your goals?

At Breathing Deeply Yoga Therapy, we offer private, online sessions with certified yoga therapists. If you’re looking to treat a specific condition with yoga, a knowledgeable yoga therapist can help. We’ve worked with clients who suffer from back pain, arthritis, stress, depression, anxiety, trauma/PTSD, autoimmune diseases, chronic pain, and much more.

Learn about working with our yoga therapists here, or if you want to become a yoga therapist yourself, check out our yoga therapy training programs.

Lower Cross Syndrome Yoga: Exercises, Causes, and Treatment

A woman practicing Head to Knee Pose as part of her Lower Cross Syndrome yoga

A woman practicing Head to Knee Pose as part of her Lower Cross Syndrome yoga

People aren’t made to sit all day, but nowadays, many of us do. This can lead to Upper Cross Syndrome, discussed in a previous blog post, which impacts your upper body and can cause pain in your neck, shoulders, chest, and upper back. It can also result in Lower Cross Syndrome, which affects your lower body and usually causes lower back pain. Fortunately, with the right Lower Cross Syndrome yoga techniques, most people are able to overcome this issue.

I’m Brandt Passalacqua, the Co-Founder and Lead Teacher of Breathing Deeply Yoga Therapy. My mission is to make therapeutic yoga techniques more accessible to others. Whether you have this syndrome yourself or simply want to help clients who have it, keep reading to learn more about this condition, its causes and symptoms, and how to use yoga for Lower Cross Syndrome.

If you’re ready to go further, those who are suffering from Lower Cross Syndrome are welcome to seek one-on-one help online from myself or another yoga therapist I’ve trained. Those who want to learn to help others heal with yoga are encouraged to look into our yoga therapy training programs.

Table of Contents:

What Is Lower Cross Syndrome?

Lower Cross Syndrome (LCS) is a health condition characterized by an imbalance of muscle strength around the pelvic region. Some muscles are too tight while others are too weak. This particular pattern of lower body muscular imbalances can affect your posture and movement, which often results in pain or discomfort. Lower Cross Syndrome can range from a minor inconvenience to something that negatively impacts your daily life.

What Is Lower Crossed Syndrome?

As you may have guessed, Lower Cross Syndrome is also sometimes referred to as Lower Crossed Syndrome. Both are correct.

What Causes Lower Cross Syndrome?

In a technical sense, Lower Cross Syndrome is caused by the steady weakening and underuse of certain muscle groups and overworking or shortening of others. Common causes of these muscle imbalances include:

  • Sedentary lifestyle
  • Prolonged sitting
  • Poor posture
  • Long hours at a desk or computer
  • Improper weightlifting
  • Obesity
  • Aging
  • Pregnancy

Sitting for long periods of time tends to be a common denominator. When we sit for prolonged periods of time, it signals our brain to adapt. Our hip flexors get short and tight, as do our lower back muscles. At the same time, our abdominal muscles get weak, as do our glutes.

A diagram explaining what causes Lower Cross Syndrome, which is a combination of tight muscles across from weak ones

As you can see from the diagram above, the muscles across from the tight, shortened muscles become weak (that’s why it’s called lower cross syndrome).

Over time, this becomes a real issue. The lower back is over arched, which can cause back pain and disk issues. The chronically shortened hip flexors can put our hip joints into a position that eventually can degrade the integrity of the hip joints.

Which Muscles Are Overactive in Lower Crossed Syndrome?

As mentioned above, Lower Cross Syndrome is characterized by certain muscles being overactive. This overactivity results in muscle shortening and tightness. Notably, these muscles often include:

  • Hip flexors (iliopsoas, rectus femoris, and tensor fascia latae)
  • Hip adductor muscles (inner thigh and groin)
  • Thoracolumbar extensors (erector spinae, multifidus, quadratus lumborum, and latissimus dorsi)

These muscles often become overactive as a result of compensation for other weaker muscles in the body. The tightness of these muscles can lead to an exaggerated lumbar curve and anterior pelvic tilt.

What Muscles Are Weak in Lower Cross Syndrome?

While Lower Cross Syndrome is accountable for certain muscles being overactive, it’s equally responsible for contributing to the underactivity, lengthening, and weakness of others. Some of these weakened muscles include:

  • Trunk muscles (rectus abdominis, obliquus internus abdominis, obliquus externus abdominis, and transversus abdominis)
  • Abdominal core muscles (transverse abdominis and internal oblique)
  • Gluteal muscles (gluteus maximus, gluteus medius, and gluteus minimus)

In Lower Cross Syndrome, insufficient activation and underuse cause this group of muscles to lack strength, aggravating dysfunctional posture patterns.

Lower Cross Syndrome Symptoms

The main symptom of Lower Cross Syndrome is back pain. However, some individuals may notice other Lower Cross Syndrome symptoms, such as:

  • Discomfort or stiffness in the hips and the lower back
  • Tight hamstrings and back muscles
  • Weakness and fatigue, particularly in the gluteal and abdominal regions
  • Difficulty in standing up straight or standing for extended periods
  • Changes in gait, such as a small shuffle-like or waddling walk
  • Postural changes that feature an exaggerated lumbar curve and an anterior pelvic tilt (which can look like a protruding abdomen or buttocks)

The presence of these symptoms does not necessarily confirm a diagnosis of Lower Cross Syndrome. You (or your client) should always be evaluated by a medical professional for an appropriate assessment and treatment plan before starting any Lower Cross Syndrome yoga practices.

How to Fix Lower Crossed Syndrome

In an ideal world, we would just stop sitting all the time! But in the real world, it can be necessary to be able to sit for long periods of time.

Fortunately, Lower Cross Syndrome can be improved and, in many cases, resolved with a combination of stretches and lifestyle changes:

  1. Sit less. Many of us need to sit at a desk to work, but you can try taking more breaks, using a standing desk, and spending more time on your feet after work.
  2. Improve your posture. Learn how to align your body properly and get in the habit of using good posture when you stand, sit, and exercise. (To see how yoga can help with this, jump ahead!)
  3. Get more ergonomic. Pay attention to your desk or work station. Consider adjustable desks, supportive chairs, and other ergonomic equipment.
  4. Practice targeted exercises and stretches. Strengthen weak muscles and lengthen tight, shortened ones to combat Lower Cross Syndrome. (To see an example, jump ahead to the yoga poses for Lower Cross Syndrome I’ve outlined in a sequence.)
  5. Get active. Incorporate low-impact exercises like yoga into your routine. These activities can help in enhancing body stability, balance, and flexibility, while also helping you lose weight and be less sedentary.
  6. Maintain a healthy weight. Regular exercise, a balanced diet, and healthy habits can help shed excess pounds, reducing pressure on the lumbar spine.

Understand that each individual’s recovery process will differ. If you’re wondering how to fix Lower Cross Syndrome, keep in mind that what works best for one person may not work for you (or your client). One of the benefits of yoga for Lower Cross Syndrome is that it can be personalized.

Benefits of Yoga for Lower Cross Syndrome

Yoga was born out of a meditation tradition. Guess what you do when you meditate all day? You guessed it: sit! This means that the yoga tradition has very reliable and longstanding techniques to prevent sitting from becoming a problem.

Consider these benefits of yoga for Lower Cross Syndrome:

  1. Take a personalized, holistic approach. Yoga encompasses a wide range of techniques beyond just yoga poses (asanas), also including pranayama (breathing exercises), meditation, and more. It also addresses more than just physical health, improving mental, emotional, and spiritual health as well. This tends to make it a more holistic approach than Western medicine, and it can be tailored to the person at hand, especially when working with a yoga therapist.
  2. Strengthen weak muscles. There are many yoga poses that target your abs and glutes, helping to strengthen them and counteract Lower Cross Syndrome.
  3. Stretch tight muscles. Similarly, there are plenty of yoga poses for Lower Cross Syndrome that stretch and lengthen tight muscles in your hips and lower back. This can increase your flexibility, which helps to support good posture. Pranayama, or breathing exercises, can also help change your nervous system response, allowing tight muscles to stretch easier.
  4. Improve posture. Regularly practicing yoga techniques, such as asanas, pranayama, and meditation, can increase your awareness of your body’s position, motion, and equilibrium. Many yoga poses also teach you proper alignment for your body. Together, this enables you to improve your posture as you recognize poor alignment and know how to fix it. Longer, slower movements in yoga can also help to hydrate and reshape your fascial structure so it’s easier to maintain good posture.
  5. Support habit change. Yoga can help you to form new patterns and regulate, both of which support habit change. For those with LCS, this can help with sticking to an exercise routine, maintaining better posture, and committing to healthy eating habits.
  6. Increase activity. A sedentary lifestyle can easily lead to Lower Cross Syndrome. Not only does yoga allow you to target the muscle groups affected by LCS, but also it gets you active and moving, which can help combat Lower Cross Syndrome in general.
  7. Lose weight. Obesity can contribute to Lower Cross Syndrome, putting extra pressure on your lumbar spine. Yoga can help with weight loss in a variety of ways, such as supporting habit change, improving mindfulness, increasing mobility, and reducing stress.
  8. Reduce stress and anxiety. Many yoga poses promote relaxation and stress relief, which can further help alleviate muscle tension, a notable symptom of LCS.

8 Yoga Poses for Lower Cross Syndrome in Sequence

lower cross syndrome 1 (1)

Everyone is different, with their own medical history, health conditions, lifestyle, and goals. That’s why it’s so important to work with a yoga therapist who can develop a personalized and therapeutic approach for you to use yoga for Lower Cross Syndrome.

In general, however, Lower Cross Syndrome yoga techniques will involve strengthening your weak muscles (glutes and abdominals) and stretching your tight muscles (hip flexors and lower back erectors). I’ve shared an example of 8 yoga poses for Lower Cross Syndrome in sequence, which can be practiced in between sitting sessions. Also, feel free to break this sequence up during the day if that’s the only way to fit it in.

1. Squats (Malasana)

A woman practicing Malasana, or squats, as part of her yoga for Lower Cross Syndrome

A great Lower Cross Syndrome yoga pose to start with is Malasana, also known as the Squat Pose. This posture, when performed right, can help strengthen the gluteal muscles and stretch the groin and hip flexors.

  • Stand tall with your feet slightly wider than hip-width apart. Angle your toes outward.
  • As you exhale, lower your body into a squat, going as low as it feels comfortable. Aim to get your hips at knee level or lower.
  • Hold your arms straight out in front of you or clasp them together in front of your heart. Keep your chest lifted and your spine long. Engage your core muscles.
  • As you inhale, raise your body into a standing position.
  • Repeat 6 to 10 times.

2. Plank Pose on Forearms

This variation on Plank Pose is a full-body exercise that engages multiple muscle groups at once. Particularly, it is instrumental in strengthening the deep core muscles (transverse abdominis), the exterior abs (rectus abdominis), and the internal obliques, all of which are often weak in people with Lower Cross Syndrome. This pose can help improve strength, endurance, and postural stability, all of which are critical for managing and treating LCS.

  • Lie down on your stomach with your arms under your shoulders and your palms flat on the mat beneath you.
  • Lift your body up so you’re resting on your forearms, keeping your shoulders directly above your elbows.
  • Keep your back straight and engage your core muscles, lifting your navel towards your spine.
  • Hold until you feel fatigued, then drop down to rest on your belly.

3. Half Locust Pose with Bending Knees

A man demonstrating Half Locust Pose with Bending Knees as one of his yoga poses for lower cross syndrome

Locust Pose is a prone, back-bending pose that’s excellent for strengthening the back of the body. In particular, it targets the muscles that maintain upright posture—namely, the erector spinae and the multifidus. The pose also stretches the hip flexors, which can be overly tight in those with Lower Cross Syndrome. By lifting and bending one leg at a time in the Half Locust Pose, you target the muscles in your lower back, glutes, and thighs.

  • Lie flat on your stomach with your legs extended back and your arms at your sides.
  • As you inhale, lift your right leg up behind you, holding it straight.
  • As you exhale, bend your right knee at a right angle, with your foot toward the ceiling.
  • As you inhale again, extend your right leg again so it’s straight.
  • As you exhale again, release your right leg, letting it rest again on the mat.
  • Repeat 3 to 6 times on each side, alternating right and left.

4. Child’s Pose

Child’s Pose is a restful pose that offers a gentle stretch to the hips, thighs, and ankles while releasing tension in the lower back and neck. It’s an effective pose for alleviating tightness and discomfort stemming from Lower Cross Syndrome.

  • Kneel down on your mat with your big toes pointed inward, touching each other.
  • Separate your knees about as wide as your hips, or as close as you comfortably can.
  • As you exhale, drop your torso between your thighs and extend your arms in front of you, palms down on the mat.
  • Bring your forehead to the mat and gently pull your hips down towards your heels.
  • Hold for 6 breaths.

5. Runner’s Lunge

A man showing how to fix lower crossed syndrome with yoga poses such as Runner's Lunge

After resting in Child’s Pose, you can use Runner’s Lunge in your yoga for Lower Cross Syndrome sequence to stretch the hip flexors, particularly the psoas, which tends to be tight in those with Lower Cross Syndrome. The pose also helps in strengthening the gluteus muscles, enhancing lower body stability.

  • Kneel down on your hands and knees.
  • Step one foot forward between your hands. This foot should be directly under your knee, creating a 90-degree angle.
  • Slide the back leg so it’s extended behind you.
  • Keep your fingertips on the mat, or you can put your hand on the thigh of the forward leg. Feel the stretch in your quads.
  • Hold for 6 to 10 breaths, then repeat on the other side.

6. Head-to-Knee Pose

A seated forward bend, Head-to-Knee Pose is another great yoga pose for Lower Cross Syndrome. It enables a deep stretch in the hips, hamstrings, and lower back, where tension often accumulates. By focusing on one side of the body at a time, it helps isolate these muscles for a better stretch.

  • Sit on your mat with your legs extended straight out in front of you.
  • Bend one knee to the side, and place the sole of your foot against the inner thigh of the stretched leg.
  • As you inhale, raise your arms above your head, lengthening the spine.
  • As you exhale, bend forward from your waist over the straight leg, reaching with your hands to hold your foot, ankle, or leg.
  • Hold for 6 to 10 breaths, then repeat on the other side.

7. Rolling Bridge Pose

A person demonstrates one example of lower cross syndrome yoga by practicing Rolling Bridge Pose

Bridge Pose is a powerful Lower Cross Syndrome yoga pose because it strengthens the back of the body while also stretching the hip flexors and chest. With this rolling variation, you can incorporate more movement and corresponding breath than if you held a stationary Bridge Pose.

  • Lie flat on your back, with your knees bent and your feet flat on the mat, hip-distance apart.
  • Place your arms flat on the mat along your torso with your palms down.
  • As you inhale, press your feet into the mat and raise your hips, rolling your spine off the floor. Be sure to keep your knees directly above your ankles.
  • Hold your thighs parallel to the mat if you can, engaging your glutes and leg muscles.
  • As you exhale, lower your hips back down onto the mat, keeping your knees bent.
  • Repeat 6 to 10 times.

8. Savasana

Savasana, also known as Corpse Pose, is a common way to close a yoga sequence. It encourages your body to rest and absorb the benefits of the Lower Cross Syndrome yoga poses that came before it. For those with LCS, this can be a great way to reduce muscle tension and increase bodily awareness. Although it may look straightforward and passive, Savasana is an intentional pose that fosters mindfulness, relaxation, and a stronger mind-body connection.

  • Lie supine on your back, with your arms comfortably by your sides and your legs comfortably extended.
  • You may want to close your eyes.
  • Take a deep breath, and as you exhale, allow your body to relax completely into the yoga mat. Notice how each part of your body feels, releasing any tension you notice along the way.
  • Hold this pose for 1–3 minutes.

How Long Does It Take to Fix Lower Cross Syndrome?

The amount of time it takes to effectively treat and potentially fix Lower Cross Syndrome depends on a variety of factors, including

  • The severity of the condition
  • How well you follow your treatment regimen
  • How consistently you work on your posture
  • Whether lifestyle changes need to be made and are followed
  • Your overall health

In my experience, many people can make a lot of progress within 8 weeks of practicing yoga for Lower Cross Syndrome.

It’s important to be patient and persistent. Lower Cross Syndrome is commonly caused by poor habits accumulated over years, and correcting these patterns takes time. The goal should not be to rush through the process but to achieve a sustainable improvement in posture and other supportive habits.

How to Sleep with Lower Cross Syndrome

If you experience discomfort trying to sleep with Lower Cross Syndrome, consider sleeping flat on your back if that’s a suitable option for you. This can allow your hip flexors to not be as shortened while you’re sleeping. But this is not necessary in order to treat or overcome LCS.

Get Started with Lower Cross Syndrome Yoga Therapy

Are you interested in Lower Cross Syndrome yoga therapy? I have personally helped numerous clients work through this condition, and I also teach my yoga therapy students how to address common issues like this one. Sign up to work online with myself or a yoga therapist I’ve trained if you have LCS, or check out our yoga therapy training if you want to work with LCS clients yourself.

Yoga Therapy Q&A: Grief, Depression & Surgeries

grief and yoga therapy

Welcome to episode 70 of The Breathing Deeply Yoga Therapy and Meditation podcast.

In today’s Q&A, Breathing Deeply founder and lead teacher, Brandt Passalacqua sits down with his students to ask their yoga therapy questions. 

This Q&A has a special emphasis on working with grief, depression and women who have had major surgeries. 

Brandt answers questions covering breathing techniques to support grief, and tips on how to help clients who are grieving including rituals and cultural influences. 

 Brandt also offers advice on approaching someone who has had a double mastectomy and advice on how to help someone struggling with core strength and balance after a hysterectomy.

This clip has been taken from a live Q&A session with Brandt and his yoga therapy students.

We hope you enjoy this Q&A. Let us know in the comments any key takeaways you had and share it with someone you think it may benefit!

Our next Yoga Therapy Course starts on February 13, 2024. Find out more information here: https://bit.ly/3lxc0KK

Om Shanthi, Om Peace

This episode covers:

  • How do I teach Brahmana breath for grief?
  • Tips on how to support clients with depression
  • Helping people from different cultures with grief as a yoga therapist
  • The purpose of creating a ritual for grief & what is out of scope for yoga therapists
  • What is the definition of the early stages of grief
  • How to do muscle testing on someone with a double mastectomy?
  • How do I work with someone with core & balance issues from a hysterectomy?

Breathing Deeply is a Yoga Therapy and Meditation School, founded by lead teacher Brand Passalacqua in 2014. We hold online and in-person Yoga Therapy Foundations and IAYT accredited Advanced Programs and retreats along with Meditation Programs, including online meditation teacher training and certification and holistic weight loss with Being At Peace with Food.

Breathing Deeply is made up of an active and thriving community of yogis, caregivers, therapists, teachers, medical professionals, parents & children with the same intention—to serve others, lessen suffering, and co-create a new paradigm in wellness.

Yoga Poses to Avoid with Hip Bursitis & What to Do Instead

A young woman practicing supine Figure-Four Pose instead of yoga poses to avoid with hip bursitis

For some with hip bursitis, yoga can be a safe, practical, and effective way to alleviate pain. Hip bursitis is an uncomfortable and sometimes debilitating condition, particularly when it is chronic. Studies have shown that yoga can help with mobility, managing pain, and reducing stress, which makes it an excellent option for hip bursitis. But first, it’s important to understand which yoga poses to avoid with hip bursitis, which yoga techniques can help, and how to safely get started.

If you’ve seen a doctor, rested your hip, and perhaps even tried medications or injections as prescribed to no avail, it may be time to give yoga a try. I’m Brandt Passalacqua, a certified yoga therapist and co-founder of the Breathing Deeply Yoga Therapy school. My mission is to help others heal with yoga, which is why I’m here to explain everything you need to know about yoga for hip bursitis.

Keep reading to learn more or contact us to work with a yoga therapist for your hip bursitis.

Table of Contents:

How Yoga Helps Hip Bursitis

Finding holistic approaches to improving mobility and reducing pain is a common goal among those with hip bursitis. Yoga can provide this type of approach thanks to its large variety of hip-focused poses that reduce stiffness, expand range of motion, strengthen muscles that support the hips, and minimize discomfort while moving.

Those suffering from hip bursitis may benefit from yoga in 5 main ways:

  1. Greater flexibility and range of motion
  2. Muscle development
  3. Stress, pain, and tension relief
  4. Better posture
  5. Improved circulation and blood flow

To better support and stabilize the hip joint, many yoga poses work to strengthen the muscles in and around it. These include the glutes, the outer hip muscles, and the quadriceps. This not only promotes healthy posture and alignment, but also reduces muscular imbalances that can cause pain and limit mobility.

Yoga’s emphasis on self-awareness, deep breathing, and other relaxation methods makes it an effective tool for combating stress. This can make it easier to manage pain when it does occur.

By knowing which yoga poses to avoid with hip bursitis and which ones may work best, it’s possible to increase blood flow directly in and around the hip area. Increased blood flow delivers oxygen and nutrients to working muscles, reduces inflammation, and benefits the hips as a whole.

Yoga Poses to Avoid with Hip Bursitis

A middle-aged woman who has considered yoga vs Pilates for back pain practices a neutral standing pose

Always pay attention to how your body reacts to different movements or holds, and stay away from poses that feel too strenuous. In general, avoid anything that irritates the hip, which usually involves the ends of your range of motion.

Some of the most common yoga poses to avoid with hip bursitis are:

  • Pigeon Pose: As a hip-opening pose, Pigeon Pose can potentially push your range of motion too far. It can stress your hips in both flexion and extension.
  • Triangle Pose: Triangle Pose involves folding at the hips, potentially stressing your hips in extension and causing hip internal rotation. Similarly, Extended Triangle Pose requires extensive stretching and may be too taxing on the hip sockets.
  • Downward Dog Pose: With your hips raised into the air, this pose puts weight onto your hips that can be too much for those with hip bursitis, straining the hips in flexion.
  • Fire Log Pose: Stacking your shins in Fire Log Pose may put pressure on your hip joints and make your hip bursitis worse.
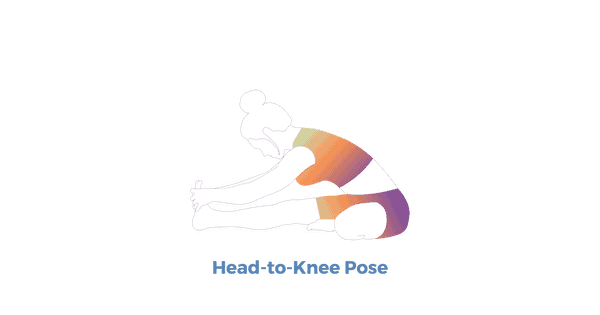
  • Forward Fold: By bending at the hips, Forward Folds can put strain on your hips and stress them in flexion. Even in a Seated Forward Bend, your hip joints may feel strain because it still requires you to sit with yourself bent forward.
  • Happy Baby Pose: By pulling your thighs up toward your chest, you can strain your hips in flexion with this pose.
  • Lotus Pose: The significant external rotation required by the Lotus Pose might aggravate existing bursitis in the hips.
  • Warrior 1 and 2 Poses: Both Warrior 1 and Warrior 2 involve lunging. If you lunge too deeply, you can reach extremes for your hips in extension.
  • Seated Twist: Sitting cross-legged and twisting from your spine can put your hip in higher adduction as well as stress it in flexion.
  • Crescent Lunge: As with other lunges, stretching too deeply can push your hips to the extreme in extension.
  • Half Moon Pose: This pose involves bending at the hip and holding one leg parallel to the floor, which can put strain on your hips and cause hip internal rotation.
  • Eagle Pose: As you cross your legs at the thighs and balance on one leg, you open up your hips. But Eagle Pose can create too much hip internal rotation for those with hip bursitis and put your hip in higher adduction.

This is not an exhaustive or exclusive list. When determining which yoga poses to avoid with hip bursitis for yourself, keep the following advice in mind:

  • Be careful with deep lunges or squats.
  • Avoid bearing weight on your hip.
  • Don’t stretch your hips too deeply or for too long.
  • Avoid repetitive hip movements.
  • If you have pain on one side of your hips, avoid irritating that side.
  • Don’t try to push through the pain.

Another way to safeguard your hips during yoga is by consulting with a certified yoga therapist or healthcare practitioner who is familiar with your condition. Comfort and safety should always come first. A yoga therapist can teach you about appropriate adjustments and alternative poses that work well for those with hip bursitis.

Modifying Yoga Poses for Hip Bursitis

An older man uses a chair for balance and support while stretching, showing that chair yoga is good for weight loss and mobility

Now that you know which yoga poses to avoid with hip bursitis, we can turn our attention to what you can do instead. People who suffer from hip bursitis can easily adapt a variety of different yoga poses to their specific needs.

The key to using yoga for hip bursitis is to avoid movements that cause pain, avoid repetitive hip movements, and avoid pushing yourself too far when stretching. Even if you don’t feel pain in the moment from repetitive movements or deep stretches, your hip will probably hurt later. Stretching can release chemicals in your brain that can even make it feel good, but if you’re irritating the burse, you’re going to feel it later.

Be sure to really rest your hip long enough for it to get better. Even if you only recently got hip bursitis, you can still move and be active, but take care to let your hip rest and heal.

To help you modify yoga poses safely and effectively, use these additional tips:

  • Support yourself with cushions, blankets, or bolsters to ease the pressure on your hips. For instance, using a cushion to raise your hips can make seated yoga poses more comfortable.
  • Don’t go too deep. To avoid hip discomfort, come into a pose at a shallower depth. With a Forward Fold, for instance, you can reduce the strain on your hip flexors by bending your knees slightly.
  • Use a chair in your yoga sequence to provide you with the balance and support you need. For standing postures like Warrior I and II, for instance, modifying the poses with a chair can increase your stability and lessen the strain on your hips.
  • Take care with twists. Twisting postures can cause hip pain if held for too long. Focus on keeping your spine neutral and your core engaged instead of extending twists.

3 Yoga Poses to Consider for Hip Bursitis

By increasing circulation to the hip area and loosening up the hip flexors, certain yoga poses can offer relief to those with hip bursitis. Poses that gently stretch and strengthen the muscles around your hips (such as the glutes, outer hip muscles, and quadriceps) tend to be especially beneficial.

When using yoga therapeutically, there is no one-size-fits-all solution. By its very nature, yoga therapy takes into account an individual’s specific health conditions, history, lifestyle, and desired outcomes to determine which yoga techniques to use and how to apply them.

For this reason, I can’t say there are certain yoga poses that will work well for everyone with hip bursitis. But there are some poses that may be more likely to help and avoid common contraindications.
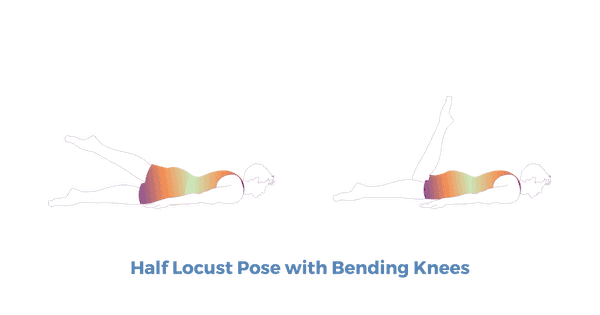
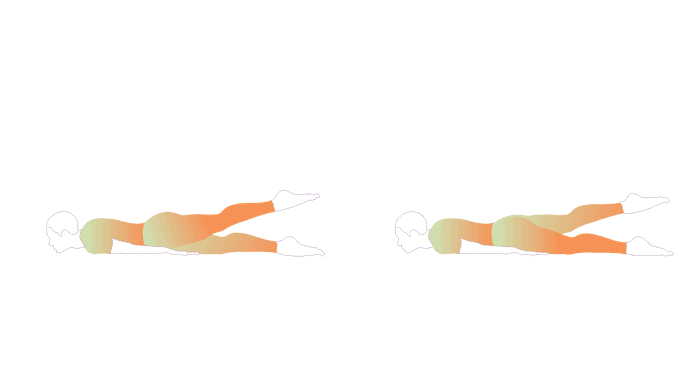
1. Half Locust Pose

A person with hip bursitis practicing Half Locust Pose

Half Locust Pose is a pose performed while lying prone on your stomach. It involves lifting one leg up behind you while keeping the rest of your limbs on the floor. By targeting a single leg at a time, it focuses on strengthening the hamstrings and glutes. The glutes are often weak in those with hip bursitis, contributing to poor usage of the hip joint.

Rather than simply holding this pose, I recommend lifting the leg, pausing, lowering it, and repeating several times on the same leg before switching to the other side. This will help build up greater strength in the glutes, supporting good hip function.

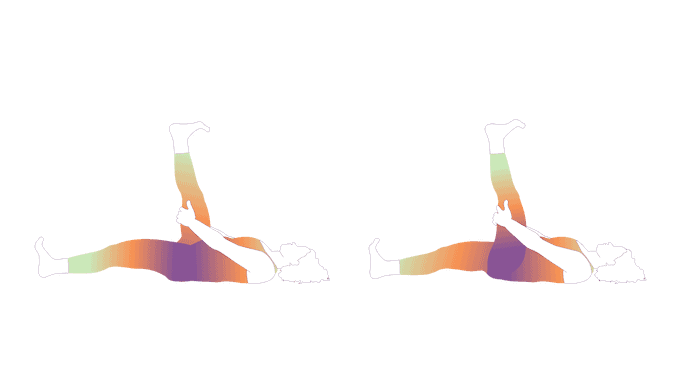
2. Reclining Big Toe Pose

An example of someone practicing Reclining Big Toe Pose, which is not among the yoga poses to avoid with hip bursitis

By gradually stretching the hip flexors, you can increase your flexibility and mobility with the Reclining Big Toe Pose. While lying on your back, you’ll keep one leg extended on the mat and the other extended toward the ceiling, held in place by your fingers. This stretch relieves stress on the hip joints by lengthening the groin muscle.

Controlling your movement in this pose is key for those who suffer from hip discomfort, as it enables you to tailor the intensity of the stretch to your unique needs. This kind of gentle and controlled stretching increases blood flow to the hip region as well.

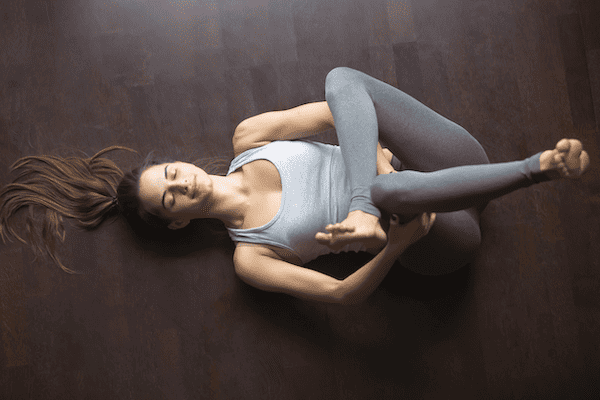
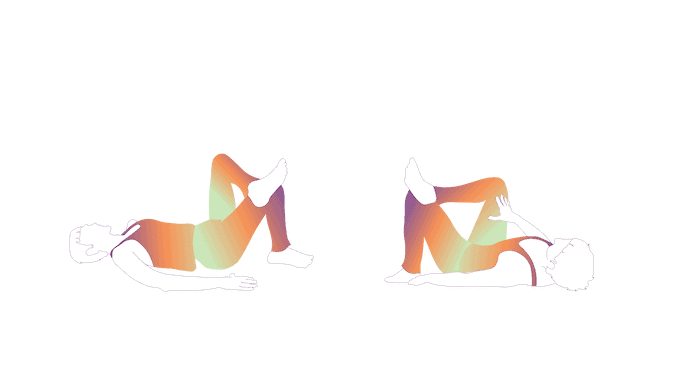
3. Supine Figure-Four Pose

A person practicing Supine Figure-Four Pose to help with their hip bursitis

To practice Figure-Four Pose (also known as One-Legged Chair Pose, Half Chair Pose, and Whooping Crane Pose), you bring one foot over the knee of the other leg while bending slightly at the hips, as if sitting in the air. For the supine version that I recommend, you practice this position while lying on your back instead of standing. The result is a good hip stretch that especially benefits the hip flexors and external rotators.

This stretch can help loosen up stiff hips and improve mobility. It can also be easily adjusted to the appropriate depth by moving your hips and torso lower or higher as needed. To hold this position, you’ll need to use your glutes and external rotators, among other hip muscles, building on their strength.

Additional Yoga Techniques for Hip Bursitis

So far, our focus has been on yoga poses to avoid with hip bursitis and ones to consider instead. But yoga offers more techniques than just asanas, or yoga poses.

Pranayama

Pranayama, or breathing techniques, can be used as pain management tools for hip bursitis. Breath work can reduce stress, instill a sense of calm, reduce pain, and boost general health and happiness. Two types of breathing exercises in particular to consider for dealing with stress and pain are diaphragmatic breathing and alternate nostril breathing.
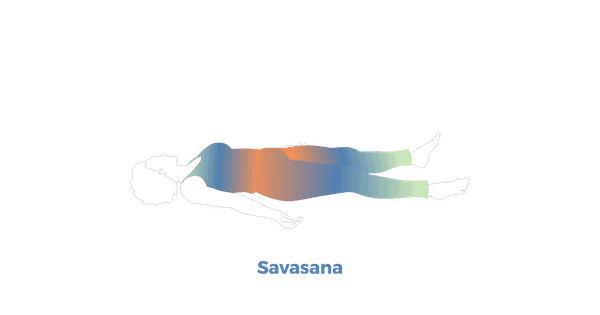
Yoga Nidra

Yoga nidra is a practice that brings you into a relaxed state between wakefulness and sleep. Most often, a professional guides you through yoga nidra while you lie down. One of its chief benefits is that it is similar to meditation but requires less skill to achieve results.

Hip flexors are only one muscle group that benefits from yoga nidra’s methodical approach to restfulness. Yoga nidra can help induce healing brainwave states, which can potentially help you heal faster. It can also improve your sleep, which can improve healing too.

Yoga nidra can change how you experience pain, anxiety, or trauma. It helps you to regulate your responses, feel calmer, and change your perspective.

How to Get Help with Yoga

Yoga can bring a wide variety of benefits to your life, including increased happiness, less pain, more mobility, and better overall health. To get the best results from doing yoga, it’s helpful to work with a professional yoga instructor or yoga therapist.

When to Do Group Yoga Classes

Because of the uplifting atmosphere and sense of community they foster, many people believe that yoga classes are a great option for those who learn best in a social setting. Those interested in broader health and well-being, as well as a more general yoga experience, will find that group classes provide the best of both worlds.

Yoga classes are led by a trained instructor. The variety of classes available for groups makes it possible to delve into different styles of yoga that may be of interest to you.

When taking part in group yoga, keep in mind that you won’t receive as much individualized attention. As a result, the class may practice some yoga poses you should avoid with hip bursitis. Because of this, it’s best to find a class that moves at a slower speed that allows you to make necessary modifications. But you must be responsible for practicing yoga safely with hip bursitis.

When to Do Yoga Therapy Sessions

Yoga therapy sessions work well for those seeking help with a specific condition, illness, or injury, like hip bursitis. Your yoga therapist will evaluate your mental, physical, and emotional health to create a holistic approach that addresses your condition therapeutically.

Private yoga therapy sessions take your unique circumstances into account, resulting in better health outcomes. Yoga therapy is targeted to your goals and health, unlike group yoga classes.

If you have chronic hip bursitis, a yoga therapist can teach you techniques to even out your musculature and create an environment in which you are less likely to get hip bursitis again. Best of all, you are empowered to practice these techniques on your own. Like physical therapy, yoga therapy sessions are not intended to go on indefinitely.

Work with Our Yoga Therapists

Have you been dealing with hip bursitis for weeks? Or hip bursitis that keeps coming back? Yoga therapy may be able to help relieve your pain and prevent it from returning.

I’m pleased to be able to offer private, one-on-one yoga therapy sessions with myself and several other certified yoga therapists via Zoom. Learn more about our private sessions and fill out the contact form on the bottom of the page today to get started.

  • Recent Posts

  • Recent Comments

  • Archives

  • Categories

  • Meta